標籤

BAT (38) shell (34) Virtual Machine (33) Xubuntu (29) acfs (25) PHP (24) CentOS (21) Virtul Box (20) 編輯器 (17) 資料庫 (15) lubuntu (13) windows (13) CPP (12) ubuntu (12) chrome (11) laravel (10) Docker (9) Python (9) 5A88 (7) VMware (6) 資料結構 (6) Javascript (5) Node (5) Proxmox VE (5) 公告系統 (5) 程式積木 (5) Android Studio (4) ANN (3) OB2D2016x64 (3) Xoops (3) clonezilla (3) samba (3) 公文 (3) 其他 (3) 硬體 (3) API (2) Android (2) AppInvent2 (2) Html (2) Hyper-V (2) Nas (2) botnet (2) mbot (2) swift (2) wordpress (2) 樣板 (2) 防火牆 (2) AD的應用 (1) Ansible (1) Arduino (1) CSS (1) GitLab (1) HA Proxy (1) LegoEV3 (1) PowerShell (1) Scratch (1) VM (1) XenServer (1) kotlin (1) linuxmint (1) lxc (1)

2020年5月31日 星期日

用shell在Xubuntu 16.04快速安裝與使用MongoDB社群版

用shell在Xubuntu 16.04快速安裝與使用MongoDB社群版
檔案名稱:MongodbInstall.sh
內容:
#!/bin/bash
apt-get install gnupg
wget -qO - https://www.mongodb.org/static/pgp/server-4.2.asc | sudo apt-key add -
echo "deb [ arch=amd64,arm64 ] https://repo.mongodb.org/apt/ubuntu xenial/mongodb-org/4.2 multiverse" | sudo tee /etc/apt/sources.list.d/mongodb-org-4.2.list
apt-get update
apt-get install -y mongodb-org
目前用shell安裝後,會出現錯誤訊息
                              
因此,修正為指定版本即可。

檔案名稱:MongodbInstall.sh
內容:
#!/bin/bash
apt-get install gnupg
wget -qO - https://www.mongodb.org/static/pgp/server-4.2.asc | sudo apt-key add -
echo "deb [ arch=amd64,arm64 ] https://repo.mongodb.org/apt/ubuntu xenial/mongodb-org/4.2 multiverse" | sudo tee /etc/apt/sources.list.d/mongodb-org-4.2.list
apt-get update
apt-get install -y mongodb-org=4.2.7 mongodb-org-server=4.2.7 mongodb-org-shell=4.2.7 mongodb-org-mongos=4.2.7 mongodb-org-tools=4.2.7

以下訊息為緣由與相關思考歷程:

        最近學習Node.js,使用npm install mongodb。結果錯誤連連,也不會除錯。找大神求解,才驚覺npm install mongodb 這個指令是安裝 mongodb Nodejs的驅動driver。而不是安裝mongodb。趕緊補強,並做成紀錄。
一、使用Xubuntu 內的mongodb
1.安裝mongodb
$sudo apt-get install mongodb

2.檢查mongodb版本
$mongo -version


3.啟動、關閉與重啟mongodb
$service mongodb start
$service mongodb stop
$service mongodb restart

4.解除安裝 mongodb
$sudo apt-get --purge remove mongodb mongodb-clients mongodb-server

5.shell模式使用mongodb,預設連接的資料庫為test
$mongo

6.常用指令
(1)顯示資料庫列表
show dbs
(2)顯示當前資料庫內的資料表table
show collections
(3)切換資料庫到yourDB。若是沒有yourDB,則會先建立yourDB,再切換。
use yourDB
(4)顯示所有用戶
show users
(5)顯示資料庫操作指令
db.help()
(6)顯示資料表yourCollection操作指令
db.yourCollection.help()
(7)離開資料庫
exit

以例子說明
目的:建立一個資料庫school,內有兩個collection分別為teacher與student
在student,新增兩筆資料:
第一筆資料name:test01,age:14
第二筆資料name:test02,age:15
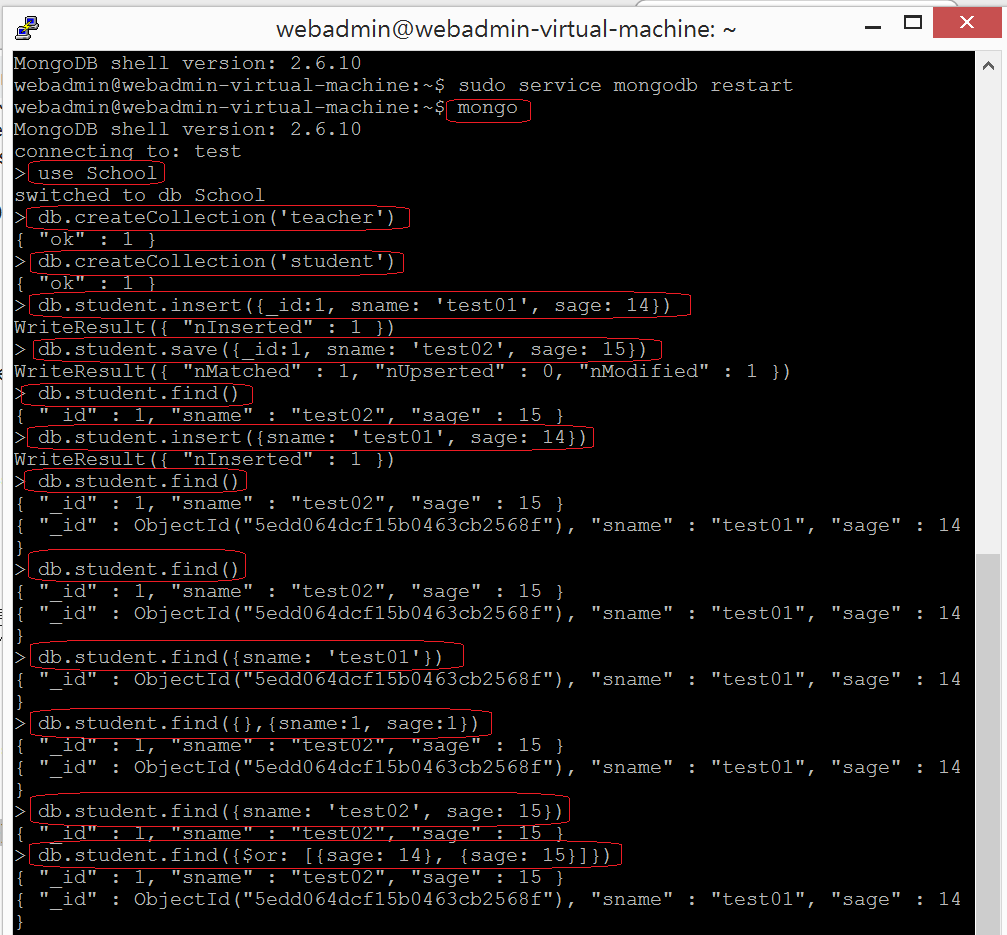
切换到School資料庫
use School
創建Collection
db.createCollection('teacher')
db.createCollection('student')
新增資料
若新增的資料已有_id:1
db.student.insert({_id:1, sname: 'test01', sage: 14})
db.student.save({_id:1, sname: 'test02', sage: 15})
在手動新增時有_id时,如果_id已經存在,insert不做操作,save做更新操作;
若插入的資料沒有_id
db.student.insert({sname: 'test01', sage: 14})
db.student.save({sname: 'test02', sage: 15})
則兩者作用相同,均是新增資料

資料查詢
#查詢所有紀錄。
db.student.find()  相當於:select * from student

#查詢sname='test01'的紀錄。
db.student.find({sname: 'test01'})
相當於: select * from student where sname='test01'

#查詢指定列sname、sage資料。
db.student.find({},{sname:1, sage:1})
相當於:select sname,sage from student。
sname:1表示返回sname列,預設_id字段也是返回的,可以添加_id:0(意為不返回_id)寫成
{sname: 1, sage: 1,_id:0},就不會返回預設的_id字段了

#and 條件查詢。
db.student.find({sname: 'test02', sage: 15})
相當於:select * from student where sname = 'test02' and sage = 15

#or 條件查詢。
db.student.find({$or: [{sage: 14}, {sage: 15}]})
相當於:select * from student where sage = 14 or sage = 15

二、使用MongoDB社群版
後來在mongodb官網:mongodb安裝,看到
現在以官網的資料為主:
1.匯入套件管理系統的公鑰(public key)
$wget -qO - https://www.mongodb.org/static/pgp/server-4.2.asc | sudo apt-key add -

若收到錯誤訊息,則要安裝gnupg
$sudo apt-get install gnupg
然後
$wget -qO - https://www.mongodb.org/static/pgp/server-4.2.asc | sudo apt-key add -

2.新增至Xubuntu 16.04的apt套件庫
$echo "deb [ arch=amd64,arm64 ] https://repo.mongodb.org/apt/ubuntu xenial/mongodb-org/4.2 multiverse" | sudo tee /etc/apt/sources.list.d/mongodb-org-4.2.list

3.Xubuntu 16.04的apt套件庫更新
$sudo apt-get update

4.安裝mongodb套件
(1)最新版
$sudo apt-get install -y mongodb-org

(2)安裝指定版本4.2.7
sudo apt-get install -y mongodb-org=4.2.7 mongodb-org-server=4.2.7 mongodb-org-shell=4.2.7 mongodb-org-mongos=4.2.7 mongodb-org-tools=4.2.7

5.啟動mongodb
(1)目錄安裝位置/var/lib/mongodb
(2)日誌安裝位置/var/log/mongodb
(3)設定檔位置/etc/mongod.conf
(4)啟動、關閉與重啟mongodb
$sudo systemctl start mongod
$sudo systemctl stop mongod
$sudo systemctl restart mongod
(4)開機啟動mongodb
$sudo systemctl enable mongod
(5)mongodb狀態
$sudo systemctl status mongod

6.開始使用mongodb
$mongo

7.移除mongodb
(1)停用mongodb
$sudo systemctl stop mongod
(2)移除套件
$sudo apt-get purge mongodb-org*
(3)移除安裝目錄與日誌
$sudo rm -r /var/log/mongodb
$sudo rm -r /var/lib/mongodb

8.安全性設定
(1)綁定IP(bind IP),除了原先的127.0.0.1,還要綁定192.168.19.164
$sudo pico /etc/mongodb.conf
bind_ip = 127.0.0.1,192.168.19.164


用shell快速安裝MongoDB社群版
檔案名稱:MongodbInstall.sh
內容:
#!/bin/bash
apt-get install gnupg
wget -qO - https://www.mongodb.org/static/pgp/server-4.2.asc | sudo apt-key add -
echo "deb [ arch=amd64,arm64 ] https://repo.mongodb.org/apt/ubuntu xenial/mongodb-org/4.2 multiverse" | sudo tee /etc/apt/sources.list.d/mongodb-org-4.2.list
apt-get update
apt-get install -y mongodb-org

目前用shell安裝後,會出現錯誤訊息
                              
因此,修正為指定版本即可。
檔案名稱:MongodbInstall.sh
內容:
#!/bin/bash
apt-get install gnupg
wget -qO - https://www.mongodb.org/static/pgp/server-4.2.asc | sudo apt-key add -
echo "deb [ arch=amd64,arm64 ] https://repo.mongodb.org/apt/ubuntu xenial/mongodb-org/4.2 multiverse" | sudo tee /etc/apt/sources.list.d/mongodb-org-4.2.list
apt-get update
apt-get install -y mongodb-org=4.2.7 mongodb-org-server=4.2.7 mongodb-org-shell=4.2.7 mongodb-org-mongos=4.2.7 mongodb-org-tools=4.2.7


資料來源:
1.Ubuntu下MongoDB的安装和使用
2.Day18 - Node.JS 串接 MongoDB (含CRUD) 
3.Install MongoDB Community Edition on Ubuntu
4.mongodb官網:mongodb安裝
5.快速架設 LAMP + XOOPS

2020年5月26日 星期二

Node.js 入門_筆記與學習心得

最近學Node.js 入門!!覺得需要將學到的程式碼做個整理,來讓自己更熟悉狀況。
以下是程式碼的調整與註記:

1.簡單的網頁伺服器ch06server.js並載入外部文件ch06config.js

檔案名稱:ch06config.js
檔案內容:
const config = {
    HostName:'127.0.0.1',
    PortName:'9000'
};
exports.config = config;

檔案名稱:ch06server.js
檔案內容:
const http = require('http');
const config = require('./ch06config').config;
const server = http.createServer((req,res) => {
          res.statusCode = 200;
          res.setHeader('Content-Type','text/plain');
          switch(req.url) {
            case '/':
               res.end(`This is a / page`);
               break;
            case '/test':
               res.end(`This is a test page`);
               break;
            case '/ok':
               res.end(`This is a ok page`);
               break;
             default:
                res.end(`Server running at http://${config.HostName}:${config.PortName}`);   
          }
});

server.listen(config.PortName,config.HostName,()=>{
    console.log(`Server running at http://${config.HostName}:${config.PortName}/`);
});

2.可運行ch08index.html的網頁伺服器ch08server.js並載入外部文件ch06config.js

檔案名稱:ch06config.js
檔案內容:
const config = {
    HostName:'127.0.0.1',
    PortName:'9000'
};
exports.config = config;

檔案名稱:ch08index.html
檔案內容:
<html>
   <head>
       <title>Nodejs running indexhtml</title>
   </head>
   <body>
       <p>Nodejs running index.html</p>
   </body>
</html>

檔案名稱:ch08server.js
檔案內容:
const http = require('http');
const config = require('./ch06config').config;
const fs = require('fs');

const server = http.createServer((req,res) => {
     fs.readFile(__dirname + '/ch08index.html','utf-8',function (err,data){
         if (err) {
            res.setHeader('Content-Type','text/plain');
            res.statusCode = 404;
            res.end('Not Founded.');
         } else {
            res.setHeader('Content-Type','text/html');
            res.statusCode = 200;
            res.end(data);
         }
     });
});
server.listen(config.port,config.hostname,() => {
     console.log(`Server running at http://${config.hostname}:${config.port}/`);
});

接下來,我將1、2的程式碼整合一下。

3.將1、2的程式碼整合

檔案名稱:ch00index.html
檔案內容:
<html>
   <head>
       <title>Nodejs running ch00indexhtml</title>
   </head>
   <body>
       <h1>Nodejs running ch00index.html</h1>
   </body>
</html>

檔案名稱:ch00home01.html
檔案內容:
<html>
   <head>
       <title>Nodejs running ch00home01html</title>
   </head>
   <body>
       <h1>Nodejs running ch00home01.html</h1>
   </body>
</html>


檔案名稱:ch00test.html
檔案內容:
<html>
   <head>
       <title>Nodejs running ch00testhtml</title>
   </head>
   <body>
       <h1>Nodejs running ch00test.html</h1>
   </body>
</html>

檔案名稱:ch00config.js
檔案內容:
const config = {
    HostName:'127.0.0.1',
    PortName:'9000'
};
exports.config = config;


檔案名稱:ch00server.js
檔案內容:
const http = require('http');
const config = require('./ch00config').config;
const fs = require('fs');
 
const server = http.createServer((req,res) => {
          switch(req.url) {
            case '/':
               fs.readFile(__dirname + '/ch00index.html','utf-8',function (err,data){
                  if (err) {
                    res.setHeader('Content-Type','text/plain');
                    res.statusCode = 404;
                    res.end('Not Founded.');
                  } else {
                    res.setHeader('Content-Type','text/html');
                    res.statusCode = 200;
                    res.end(data);
                  }
                });  
               break;
            case '/home':
               fs.readFile(__dirname + '/ch00home01.html','utf-8',function (err,data){
                  if (err) {
                    res.setHeader('Content-Type','text/plain');
                    res.statusCode = 404;
                    res.end('Not Founded.');
                  } else {
                    res.setHeader('Content-Type','text/html');
                    res.statusCode = 200;
                    res.end(data);
                  }
                });
               break;
            case '/test':
               fs.readFile(__dirname + '/ch00test.html','utf-8',function (err,data){
                  if (err) {
                    res.setHeader('Content-Type','text/plain');
                    res.statusCode = 404;
                    res.end('Not Founded.');
                  } else {
                    res.setHeader('Content-Type','text/html');
                    res.statusCode = 200;
                    res.end(data);
                  }
                });
               break;
             default:
                    res.setHeader('Content-Type','text/plain');
                    res.statusCode = 404;
                    res.end('Not Founded.');
          }
});

server.listen(config.PortName,config.HostName,()=>{
    console.log(`Server running at http://${config.HostName}:${config.PortName}/`);
});

4.使用npm管理ejs(effective javascript templating)

(1)npm安裝ejs
    $npm install ejs

(2)運行ejs
檔案名稱:ch06config.js
檔案內容:
const config = {
    HostName:'127.0.0.1',
    PortName:'9000'
};
exports.config = config;

檔案:ch10index.ejs
內容:
<html>
       <title><%= title %></title>
       <body>
             <%- content %>
       </body>
</html>

檔案:ch10server.js
內容:
const http = require('http');
const fs = require('fs');
const config = require('./ch06config').config;
const ejs = require('ejs');
var template = fs.readFileSync(__dirname + '/ch10index.ejs','utf-8');

const server = http.createServer((req,res) => {
     var data = ejs.render(template,{
         title:'ch10index ejs',
         content:'<h1><strong>big ch10index ejs.</strong></h1>'
     });
     res.setHeader('Content-Type','text/html');
     res.statusCode = 200;
     res.end(data);
});
server.listen(config.port,config.hostname,() =>{
    console.log(`Server running at http://${config.hostname}:${config.port}/`);
});

5.利用外部文件ch06config.js 與ch11index.ejs,做個簡單的公告系統

檔案名稱:ch06config.js
檔案內容:
const config = {
    hostname:'127.0.0.1',
    port:'3000'
};
exports.config = config;

檔案名稱:ch11index.ejs
檔案內容:
<!DOCTYPE html>
<html lang="zh-hans">
  <head>
    <meta charset="utf-8">
    <meta name="viewport" content="width=device-width,initial-scale=1.0">
    <meta http-equiv="X-UA-Compatible" content="ie=edge">
    <title><%- title %></title>
  </head>
  <body>
   <form action="" method="POST">
     <input type="text" name="content" id="content">
     <input type="submit" value="submit">
     <ul>
       <% for( var i = 0 ; i < posts.length ; i++) { %>
         <li><%= posts[i] %></li>
       <% } %>
     </ul>
   </form>
  </body>
</html>

檔案名稱:ch11server.js
檔案內容:
const http = require('http');
const fs = require('fs');
const ejs = require('ejs');
const qs = require('querystring');
const config = require('./ch06config').config;

var template = fs.readFileSync(__dirname+'/ch11index.ejs','utf-8');
var posts = [];

const server = http.createServer((req,res)=>{
//  res.setHeader('Content-Type', 'text/html');
//  res.statusCode = 200;
//  res.end('OK');
  if (req.method === 'POST') {
    req.data = "";
    req.on("readable",function(){
      var chr =req.read();
      if (chr) {
        req.data +=chr;
      }
    });
    req.on("end",function () {
      var query = qs.parse(req.data);
      posts.push(query.content);
      showForm(posts,res);
    });
  } else {
    showForm(posts,res); 
  }
   
});

server.listen(config.port,config.hostname,()=>{
   console.log(`Server running at http://${config.hostname}:${config.port}/`);
});

function showForm(p_posts,res) {
  var data = ejs.render(template,{
      title:"TEST",
      posts:p_posts
  });
  res.setHeader('Content-Type','text/html');
  res.statusCode = 200;
  res.write(data);
  res.end(`Server running at http://${config.hostname}:${config.port}/`);
}

6.連接Mongodb

(1)安裝mongodb
$sudo apt-get install mongodb

(2)檢查版本
$mongo -version

(3)mongodb 啟動、關閉與重啟
$service mongodb start
$service mongodb stop
$service mongodb restart

(4)建立TestDB
$mongo
>use TestDB

(5)安裝mongodb driver
$npm install mongodb

(6)建立ch12mongofunc.js
const MongoClient = require('mongodb').MongoClient;
const assert = require('assert');

//connect url
const url = 'mongodb://127.0.0.1:27017';

//Database Name
const dbName = 'TestDB';

//Use connect method to connect to the server
MongoClient.connect(url,function(err,client){
    console.log(err);
    assert.equal(null,err);
    console.log("Connected successfully to server");
    const db = client.db(dbName);
    client.close();
});

7.將資料插入mongodb的TestDB內

(1)修改步驟6的ch12mongofunc.js
const MongoClient = require('mongodb').MongoClient;
const assert = require('assert');

//connect url
const url = 'mongodb://127.0.0.1:27017';

//Database Name
const dbName = 'TestDB';

//Use connect method to connect to the server
MongoClient.connect(url,function(err,client){
    assert.equal(null,err);
    console.log("Connected successfully to server");
    const db = client.db(dbName);

   db.collection("posts",function(err,collection){
      var list = [
        {title: "Mongodb connectted successfully01", tag: "Good01!" },
        {title: "Mongodb connectted successfully02", tag: "Good02!" },
        {title: "Mongodb connectted successfully03", tag: "Good!03" }
      ];
      collection.insert(list,function(err,result){
        console.log(err);
        console.log(result);
        assert.equal(null,err);
        client.close();
      });
   });
});
運行結果:
資料庫:

8.將mongodb之TestDB內資料列出

(1)修改步驟6的ch12mongofunc.js
const MongoClient = require('mongodb').MongoClient;
const assert = require('assert');

//Connection URL
const url = 'mongodb://127.0.0.1:27017'

//Database Name
const dbName = 'testlog';

//use connect method to connect to the server
MongoClient.connect(url,function (err,client) {
   assert.equal(null,err);
   console.log("Connected successfully to server");
   
   const db = client.db(dbName);

   db.collection("posts",function(err,collection){
      collection.find({tag:"Good01!"}).toArray(function(err,result){
        console.log(err);
        assert.equal(null,err);
        console.log(result);
        client.close();
      });
   });
});
運行結果:

資料庫:

9.Callback函數無窮Callback 與解決方案

狀況說明:下面檔案寫法OK(可執行),但是可讀性很差。
檔案名:ch16callbackfun01.js
內容:
function callbackfun(sql,done) {
  setTimeout(() => done(sql + " update ok!"),1000);
}
callbackfun("01.sql",done => {
  console.log(done);
  callbackfun("02.sql", done => {
    console.log(done);
    callbackfun("03.sql", done => {
      console.log(done);
    });
  });
});

解決方案1:
檔案名:ch16callbackfun02.js
內容:
function ch16callbackfunAsync(sql) {
  const p = new Promise((resolve,reject) =>{
    setTimeout(()=>{
      console.log(sql +" update ok!");
      resolve(sql+".ok!");
    },1000);
  });
  return p;
}

ch16callbackfunAsync("1.sql")
                .then(()=>ch16callbackfunAsync("2.sql"))
                .then(()=>ch16callbackfunAsync("3.sq1"));

解決方案2:
檔案名:ch16callbackfun03.js
內容:
function ch16callbackfunAsync(sql) {
  const p = new Promise((resolve, reject) => {
    setTimeout(() => {
      console.log(sql + " update ok!");
      resolve(sql + ".ok!");
    }, 1000);
  });
  return p;
}

async function ch16callbackAllfun() {
    const result01 = await ch16callbackfunAsync("1.sql");
    const result02 = await ch16callbackfunAsync("2.sql");
    const result03 = await ch16callbackfunAsync("3.sql");
    console.log(result01,result02,result03);
}
ch16callbackAllfun();


資料來源:
1.Node.js入門
2.小馬/Node.js入門
3.npm官網
4.ejs官網
5.MongoDB Node.JS Driver
6.Ubuntu下MongoDB的安装和使用
7.Day18 - Node.JS 串接 MongoDB (含CRUD) 

2020年5月20日 星期三

只要會複製貼上,快速設定行政人員電腦的電腦名稱與固定ip_修正版01

檔案下載,解壓密碼demo1234
修正理由:
1.使用AngryIPScanner掃192.168.25.0/24 的網段,由於電腦名稱使用中文名稱,名稱會出現亂碼。為能正確顯示,電腦名稱改用英文名稱。

2.上一版利用C++程式產生的bat來一鍵設定行政人員電腦的電腦名稱與固定ip
   希望能保留中文檔案名稱。

3.Windows 10 、Windows8.1與Windows 7 的網路名稱不同。需要在 config.txt 增加位置,來因應不同版本 的Windows。
Windows 10的網路名稱為Ethernet0

Windows8.1的網路名稱為乙太網路

Windows 7 的網路名稱為區域網路


修正程式碼如下:

檔名:PcNameEng2FixedIP_Generator.cpp
內容:
#include <iostream>
#include <fstream>
#define MAX_FILENAME 100
#include <stdio.h>
#include <stdlib.h>
#include <string.h>
using namespace std;

struct PcName2Ip {
char PcName[MAX_FILENAME];
char EngPcName[MAX_FILENAME];
int IP;
}; 
main() {

/*讀取設定檔的變數*/
        char NNmark[MAX_FILENAME]; 
        char NN[MAX_FILENAME]; 
        char SNMmark[MAX_FILENAME];
int SNM[4];
char GWmark[MAX_FILENAME];
int GW[4];
char DNS01mark[MAX_FILENAME];
int DNS01[4];
char DNS02mark[MAX_FILENAME];
int DNS02[4];
char UImark[MAX_FILENAME];
struct PcName2Ip UI[MAX_FILENAME];
int Total_Ip;
/*讀取設定檔config.txt,並將設定寫入變數*/
    ifstream fin("config.txt"); 
    if(!fin) { 
        cout << "無法讀入檔案\n"; 
        return 1; 
    }
/*讀取後,將設定寫入變數並呈現在螢幕上以供檢查*/
        fin >> NNmark;
fin >> NN; 
        fin >> SNMmark;
fin >> SNM[0] >> SNM[1] >> SNM[2] >> SNM[3];
        fin >> GWmark;
fin >> GW[0] >> GW[1] >> GW[2]>> GW[3];
        fin >> DNS01mark;
fin >> DNS01[0] >> DNS01[1] >> DNS01[2]>> DNS01[3];
        fin >> DNS02mark;
fin >> DNS02[0] >> DNS02[1] >> DNS02[2] >> DNS02[3];
        fin >> UImark;
Total_Ip = 1;
//讀取名稱與對應IP 
          while(!fin.eof()) {
                   fin >> UI[Total_Ip].PcName >> UI[Total_Ip].EngPcName >> UI[Total_Ip].IP;
   Total_Ip++;
if (Total_Ip>=100) {
  cout <<"\n警告!!讀取名稱與對應IP資料數超過100!!\n需修改原始碼MAX_FILENAME並重新編譯!!\n";
}
           }  
    fin.close();
    
/*依名稱與對應IP範圍輸出檔名*/
    char chFileName[MAX_FILENAME];
    FILE * fp;
    int ip[4];
    ip[0]=GW[0];
    ip[1]=GW[1];
    ip[2]=GW[2];
    for(ip[3]=1;ip[3]<=Total_Ip-1;ip[3]++) { 
    sprintf(chFileName, "%02d_%s_ip_%d_%d_%d_%d.bat",ip[3],UI[ip[3]].PcName,ip[0],ip[1],ip[2],UI[ip[3]].IP);
fp = fopen(chFileName, "w");
fprintf(fp, "@echo off\n");
fprintf(fp, "wmic.exe ComputerSystem Where Name=\"%%ComputerName%%\" call Rename Name=\"%s\" \n",UI[ip[3]].EngPcName);        
fprintf(fp, "netsh interface ip set address \"%s\" static %d.%d.%d.%d %d.%d.%d.%d %d.%d.%d.%d\n",NN,ip[0],ip[1],ip[2],UI[ip[3]].IP,SNM[0],SNM[1],SNM[2],SNM[3],GW[0],GW[1],GW[2],GW[3]);
fprintf(fp, "netsh interface ip set dns \"%s\" static %d.%d.%d.%d\n",NN,DNS01[0],DNS01[1],DNS01[2],DNS01[3]);
fprintf(fp, "netsh interface ip add dns \"%s\" %d.%d.%d.%d\n",NN,DNS02[0],DNS02[1],DNS02[2],DNS02[3]);
fprintf(fp, "shutdown -r -t 0");
fclose(fp);
}
    return 0; 
}

檔案下載
最後執行結果ok,如下圖


資料來源:
1.利用C++程式產生的bat來一鍵設定行政人員電腦的電腦名稱與固定ip

2020年5月16日 星期六

只要會複製貼上,快速設定行政人員電腦的電腦名稱與固定ip

        行政人員電腦的電腦名稱與固定ip,通常都要一台一台手動設定。如果可以用C++程式讀取設定檔,自動產生相對應行政人員電腦的電腦名稱與固定ip的bat,那該有多好。那就可以事先規劃好,再讓程式自動產生。
使用方法:
1.檔案下載
2.下載後解壓縮,解壓密碼demo1234
3.變更資料夾內的config.txt

  
4.點選資料夾內的PcName2FixedIP_Generator.exe(注意:要以系統管理員身分執行)
5.產生 名稱與對應IP範圍 數目的BAT
6.將BAT檔放置在電腦(要設定行政人員電腦的電腦名稱與固定IP)
7.對BAT點兩下(注意:要以系統管理員身分執行),即完成設定
8.此時,電腦會自動重開機,重開機後電腦名稱就會變更。


 以下是程式寫法與相關說明:
1.固定ip的bat語法,請參考此篇
2.電腦名稱的bat語法與例子:
@echo off
//@echo off不印出指令列
set name="20170315T"
//set name= "" 設定電腦名稱,上行為設定電腦名稱為20170315T
wmic.exe ComputerSystem Where Name="%ComputerName%" call Rename Name="%name%"
//變更電腦名稱
shutdown -r -t 10
//在10秒內重開機

3.接下來,我們要利用上述BAT的內容,寫入C++程式,由程式去讀取config.txt,然後產生我們要的BAT檔案。

檔名:PcName2FixedIP_Generator.cpp
內容:
#include <iostream>
#include <fstream>
#define MAX_FILENAME 100
#include <stdio.h>
#include <stdlib.h>
#include <string.h>
using namespace std;

struct PcName2Ip {
char PcName[MAX_FILENAME];
int IP;
}; 
main() {

/*讀取設定檔的變數*/
 char SNMmark[MAX_FILENAME];
int SNM[4];
char GWmark[MAX_FILENAME];
int GW[4];
char DNS01mark[MAX_FILENAME];
int DNS01[4];
char DNS02mark[MAX_FILENAME];
int DNS02[4];
char UImark[MAX_FILENAME];
struct PcName2Ip UI[MAX_FILENAME];
int Total_Ip;
/*讀取設定檔config.txt,並將設定寫入變數*/
    ifstream fin("config.txt"); 
     if(!fin) { 
        cout << "無法讀入檔案\n"; 
        return 1; 
     }

/*讀取後,將設定寫入變數並呈現在螢幕上以供檢查*/
        fin >> SNMmark;
fin >> SNM[0] >> SNM[1] >> SNM[2] >> SNM[3];
        fin >> GWmark;
fin >> GW[0] >> GW[1] >> GW[2]>> GW[3];
        fin >> DNS01mark;
fin >> DNS01[0] >> DNS01[1] >> DNS01[2]>> DNS01[3];
        fin >> DNS02mark;
fin >> DNS02[0] >> DNS02[1] >> DNS02[2] >> DNS02[3];
        fin >> UImark;
Total_Ip = 1;

//讀取名稱與對應IP 
          while(!fin.eof()) {
              fin >> UI[Total_Ip].PcName >> UI[Total_Ip].IP;
            Total_Ip++;
           if (Total_Ip>=100) {
              cout <<"\n警告!!讀取名稱與對應IP資料數超過100!!\n需修改原始碼MAX_FILENAME並重新編譯!!\n";
            }
          }  
    fin.close();
    
/*依名稱與對應IP範圍輸出檔名*/
    char chFileName[MAX_FILENAME];
    FILE * fp;
    int ip[4];
    ip[0]=GW[0];
    ip[1]=GW[1];
    ip[2]=GW[2];
    for(ip[3]=1;ip[3]<=Total_Ip-1;ip[3]++) { 
      sprintf(chFileName, "%02d_%s_ip_%d_%d_%d_%d.bat",ip[3],UI[ip[3]].PcName,ip[0],ip[1],ip[2],UI[ip[3]].IP);
    fp = fopen(chFileName, "w");
     fprintf(fp, "@echo off\n");
     fprintf(fp, "wmic.exe ComputerSystem Where Name=\"%%ComputerName%%\" call Rename Name=\"%s\" \n",UI[ip[3]].PcName);        
    fprintf(fp, "netsh interface ip set address \"區域連線\" static %d.%d.%d.%d %d.%d.%d.%d %d.%d.%d.%d\n",ip[0],ip[1],ip[2],UI[ip[3]].IP,SNM[0],SNM[1],SNM[2],SNM[3],GW[0],GW[1],GW[2],GW[3]);
     fprintf(fp, "netsh interface ip set dns \"區域連線\" static %d.%d.%d.%d\n",DNS01[0],DNS01[1],DNS01[2],DNS01[3]);
     fprintf(fp, "netsh interface ip add dns \"區域連線\" %d.%d.%d.%d\n",DNS02[0],DNS02[1],DNS02[2],DNS02[3]);
     fprintf(fp, "shutdown -r -t 0");
fclose(fp);
}  
    return 0; 
}


資料來源:
1.批次檔更改電腦名稱與設定IP
2.如何使用 shutdown.exe
3.BAT批次次指令: ECHO 的功能介紹
4.C++ - struct (C++軟體開發 - 結構 概念與實例)
5.

2020年5月14日 星期四

只要會打字,快速設定電腦教室的電腦為固定ip或dhcp

一間電腦教室大約35+1台電腦需要設定固定IP,希望能夠用C++讀取設定檔後,自動產生BAT來設定。而不要一部部電腦手動設定IP、DNS的IP。

使用方法:
1.檔案下載
2.下載後解壓縮,解壓密碼demo1234
3.變更資料夾內的config.txt


4.點選資料夾內的Fixed_IP_Generator.exe(注意:要以系統管理員身分執行)
5.產生 (固定IP起始到固定IP結束的範圍)數目的BAT
6.將BAT檔放置在電腦(要設定固定IP的)
7.對BAT點兩下(注意:要以系統管理員身分執行),即完成設定


以下是程式說明:
固定IP語法:
netsh interface ip set address "區域連線" static 固定IP 子網路遮罩 閘道
設定兩個DNS的IP
netsh interface ip set dns "區域連線" static 第一個DNS的IP
netsh interface ip add dns "區域連線" 第二個DNS的IP

例子:
固定IP:192.168.25.200
子網路遮罩:255.255.255.0
閘道IP:192.168.25.2
第一個DNS的IP:8.8.8.8
第二個DNS的IP:168.95.1.1

檔名:StaticIP.bat
內容:
netsh interface ip set address "區域連線" static 192.168.25.200 255.255.255.0 192.168.25.2
netsh interface ip set dns "區域連線" static 8.8.8.8
netsh interface ip add dns "區域連線" 168.95.1.1

設定自動取得IP(即DHCP)
netsh interface ip set address "區域連線" dhcp
設定自動取得DNS的IP(即DHCP)
netsh interface ip set dns "區域連線" dhcp

檔名:DhcpIP.bat
內容:
netsh interface ip set address "區域連線" dhcp
netsh interface ip set dns "區域連線" dhcp

接下來,我們要利用上述BAT的內容,寫入C++程式,由程式去讀取config.txt,然後產生我們要的BAT檔案。

檔名:Fixed_IP_Generator.cpp
內容:

#include <iostream>
#include <fstream>
#define MAX_FILENAME 100
#include <stdio.h>
#include <stdlib.h>
using namespace std;

main() {

/*讀取設定檔的變數*/
    char SNMmark[MAX_FILENAME];
int SNM[4];
char GWmark[MAX_FILENAME];
int GW[4];
char DR01mark[MAX_FILENAME];
int DR01[4];
char DR02mark[MAX_FILENAME];
int DR02[4];
char DNS01mark[MAX_FILENAME];
int DNS01[4];
char DNS02mark[MAX_FILENAME];
int DNS02[4];
/*讀取設定檔config.txt,並將設定寫入變數*/
    ifstream fin("config.txt");
    if(!fin) {
        cout << "無法讀入檔案\n";
        return 1;
    }
/*讀取後,將設定寫入變數並呈現在螢幕上以供檢查*/   
    while(!fin.eof()) {
fin >> SNMmark;
fin >> SNM[0] >> SNM[1] >> SNM[2] >> SNM[3];     
        fin >> GWmark;
fin >> GW[0] >> GW[1] >> GW[2]>> GW[3];
        fin >> DR01mark;
fin >> DR01[0] >> DR01[1] >> DR01[2]>> DR01[3];
        fin >> DR02mark;
fin >> DR02[0] >> DR02[1] >> DR02[2] >> DR02[3];
        fin >> DNS01mark;
fin >> DNS01[0] >> DNS01[1] >> DNS01[2]>> DNS01[3];
        fin >> DNS02mark;
fin >> DNS02[0] >> DNS02[1] >> DNS02[2] >> DNS02[3];
}
    fin.close();

/*依設定檔固定IP範圍輸出檔名*/
    char chFileName[MAX_FILENAME];
    FILE * fp;
    char ipmark[MAX_FILENAME];
    int ip[4];
    ip[0]=DR01[0];
    ip[1]=DR01[1];
    ip[2]=DR01[2];
    for ( ip[3]=DR01[3] ; ip[3]<=DR02[3] ; ip[3]++) {
   
    sprintf(chFileName, "ip_%d_%d_%d_%d.bat",ip[0],ip[1],ip[2],ip[3]);
    fp = fopen(chFileName, "w");
    fprintf(fp, "netsh interface ip set address \"區域連線\" static %d.%d.%d.%d %d.%d.%d.%d %d.%d.%d.%d\n",ip[0],ip[1],ip[2],ip[3],SNM[0],SNM[1],SNM[2],SNM[3],GW[0],GW[1],GW[2],GW[3]);   
    fprintf(fp, "netsh interface ip set dns \"區域連線\" static %d.%d.%d.%d\n",DNS01[0],DNS01[1],DNS01[2],DNS01[3]);
    fprintf(fp, "netsh interface ip add dns \"區域連線\" %d.%d.%d.%d\n",DNS02[0],DNS02[1],DNS02[2],DNS02[3]);
fclose(fp);
}
    return 0;
}

資料來源:
1.使用批次檔快速設定網路介面卡 IP
2.格式化檔案 I/O
3.怎樣指定開檔的檔案名稱
4.sprintf() - C語言庫函數

2020年5月11日 星期一

用shell 快速完成Ubuntu上snmp安裝、設定、啟動及遠程測試

         最近聽說可以用SNMP管理網路設備,那到底什麼是SNMP?可以怎麼設定?就開始找大神來了解。就開始想要實作,發現Ubuntu 可以實作!!那每次都需要安裝很多套件與相關套件。有點懶,心想用Shell一次安裝吧!!省去麻煩!!

1.安裝套件
$sudo apt-get install snmpd snmp snmp-mibs-downloader

其中:
snmpd:snmp Server套件
snmp:snmp Client套件
snmp-mibs-downloader:用來下載與更新本機的 mib ,其位置為/usr/share/mibs
檢查mib,位置在/usr/share/mibs 底下會有兩個資料夾iana 與 ietf
$cd /usr/share/mibs
$ls
如果/usr/share/mibs 底下會沒有兩個資料夾iana 與 ietf2。利用指令download-mibs,來安裝。
$sudo download-mibs

2.變更設定
   (1)備份設定文件snmpd.conf
   $sudo cp /etc/snmp/snmpd.conf /etc/snmp/snmpd.conf.bk

   (2)檢查snmpd狀態
  $sudo service snmpd status

   (3)檢查服務是否正常
   $snmpwalk -v 2c -c public localhost 1.3.6.1.2.1.1.1
   (4)變更設定
   $sudo pico /etc/snmp/snmpd.conf


   45行、46行的兩行,加入註解。如下所示:
   #view   systemonly  included   .1.3.6.1.2.1.1
   #view   systemonly  included   .1.3.6.1.2.1.25.1
   並增加一行
   view   systemonly  included   .1
   其狀況如下:

   (5)重啟snmp,並檢查狀態
   //重啟snmp
   $sudo service snmpd restart
   //檢查狀態
   $snmpwalk -v 2c -c public localhost .1.3.6.1.4.1.2021.4.3.0
   (6)設定mib
 

資料來源:
1.Ubuntu上snmp安裝、配置、啟動及遠程測試完整過程
2.snmp 介紹和Ubuntu安裝使用
3.[Ubuntu] 設定 啟動 snmp, net-snmp
4.[UBUNTU] SNMP設定、安裝
5.以SNMP即時監控網站伺服器
6.網路管理之SNMP MIB實作
7.SNMP on LINUX server 實作
8.[Win7] 設定SNMP SERVER
9.淺談Linux 系統中的SNMP Trap
10.SNMP
11.Ubuntu上snmp安装、配置、启动及远程测试
12.Shell Script 檢查檔案及目錄是否存在

在 Windows 10 x64 1909版,使用BAT快速安裝公文系統與人事服務網(自然人憑證)版

相關內容移往 https://skjhcreator.blogspot.com/2021/02/windows-10-x64-1909bat.html